Believe it or not, Christmas is not that far away! Now is the time to start thinking about all those details you want to do, but always run out of time for (at least that's what happens at my house). I will be sending out ideas for cards, gifts and wrappings over the next 11
weeks (I say 11 instead of 12 because I missed last week, so this week you are getting two ideas). These ideas are not mine alone. I joined a co-op with other creative Stampin' Up! Demonstrators and we are pooling our ideas together for each of you. Each submission will have a photo, ingredients list and instructions. I hope you find some inspiration in them! Occasionally, the key to keeping the holidays enjoyable, is keeping it simple. Here's a simple, yet elegant Christmas card. If you just can't stop at "simple", add a little Dazzling Diamonds to your
image with a Glue Pen for a little extra "wow".Supplies: Stamps Ornamental Pine (wood 135104, clear 135107) Ink Island Indigo Classic Stampin' Pad
(126986) Cherry Cobbler Classic Stampin' Pad (126966) Uni-Ball Signo Gel Pen (105021) Paper (including cutting dimensions): Island Indigo 8-1/2 X 11 Card Stock (122923) - 4" x 5 ¼"Whisper White 8-1/2X11 Card Stock (100730) 1 @ 4 ¼" x 114 @ 3 ¾" x 1 ½"Soft Sky 8-1/2" X 11" Cardstock (131203) - 3 ¾" x 5"Accessories:Stampin' Pierce Mat
(126199) Paper-Piercing Tool (126189) Tombow Multi-purpose Adhesive (110755)Confetti Stars Punch (135861)Stampin' Dimensionals (104430) Silver Mini Brads
(122941) Bone Folder (102300)1. Stamp Pine Boughs image on the Soft Sky layer with Island Indigo. Stamp in each of the upper corners as shown. Stamp again without
reinking to the right and left of the stamp in the upper left corner to give the illusion of depth. 2. Tear three small strips of white layers. Ink Christmas Wishes in Cherry Cobbler ink and stamp on one of the torn layers. 3. Pierce the ends of the stamped strip with the Paper-Piercing Tool and Pierce Mat and add two Silver Mini-brads.4. Layer the three strips of paper, starting with the layer in the back adhering to the Soft Ski White Cardstock with Tombow Multi-purpose or adhesive
of choice, about two-thirds from the top of the card. Add second layer in front of the 1st piece, adding the greeting layer to the front. Use dimensionals to attach this layer to give additional visual depth. 5. Fold White Cardstock in half and crease with the bone folder. Adhere Island Indigo Layer to the White Cardstock and then
add the stamped layer. 6. Highlight random needles with the white gel pen to "frost".7. Use the last remaining strip of white cardstock to punch stars with the Confetti Stars
Punch and adhere to card front.
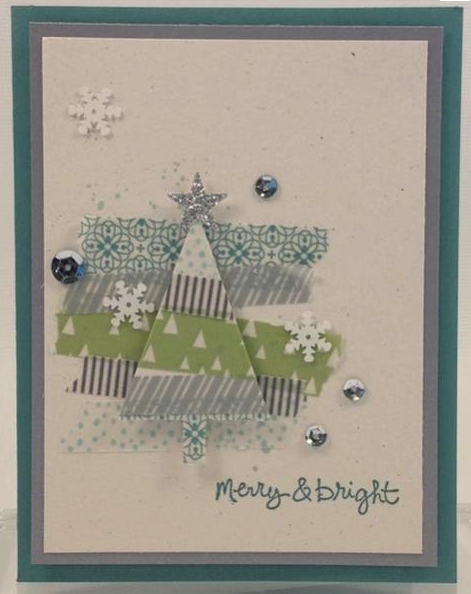
Festival of Trees & Washi Tape |
Now You See Me, Now You Don't...have fun with this "camouflage" tree! Explore with Washi Tape!SUPPLIES:Stamp Sets:Good Greetings
Stamp Set (HOSTESS-ONLY wood - 135014, clear - 135017)Gorgeous Grunge Stamp Set (wood - 130514, clear - 130517)Inks:Soft Sky Classic Stampin' Pad (131181) Lost Lagoon Classic Stampin' Pad (133644)Paper:Lost Lagoon Cardstock (133679): 5 1/2" x 8 1/2"Brushed Silver Cardstock (100712): 5 1/8" x 3 7/8"Naturals White Cardstock (102316): 4 7/8" x 3 5/8"; 3" x 2"Silver Glimmer Paper (135314): ScrapAccessories:Tree Punch (135859)Itty Bitty Accents Punch Pack (133787)All Is Calm Designer Washi Tape (135844)Frosted Sequins (135835)Stampin' Dimensionals
(104430)SNAIL Adhesive (104332)Glue Dots (103683)Dazzling Details (124117)Bone Folder (102300)Instructions:1. Fold the Lost Lagoon Cardstock in half and crease well with a Bone Folder and set aside.2. Stamp the dotted image (from Gorgeous Grunge) center left on the Naturals White Cardstock with Soft Sky Ink.3. Stamp the "merry & bright" (from Good Greetings) on the lower right of Naturals White Cardstock with Lost Lagoon Ink.4. Tear a piece of each style, of the All is Calm Washi Tape. Vary the lengths between 2 ¼ - 2 ¾...making
your center piece the longest. Layer them unevenly over Dotted Stamped Image.5. Adhere the Naturals White Cardstock Layer to the Brushed Silver Cardstock with SNAIL Adhesive.6.
Adhere the Brushed Silver Cardstock to the Lost Lagoon card base with Stampin' Dimensionals.7. On the 3" x 2" Naturals White Cardstock, create a mirror image of the Washi Tape layers...with the only exception being, to flip the green layer upside down.8. Now, turn this entire piece upside down, and punch out the Tree.9. Line up the green center piece and adhere Tree with Stampin' Dimensionals10. Punch out Star from Itty Bitty Punch Pack with Silver Glimmer Paper Scrap and Adhere with Stampin' Dimensionals.11. Use Glue Dots to adhere white snowflakes from Frosted Sequins randomly12. Use Dazzling Details to adhere silver circles from Frosted Sequins randomly.
I hope you find something inspiring in these two card examples using stamp sets from the Stampin' Up! 2014 Holiday Catalog. If you need any help designing your own card, or ordering supplies to make your cards, please contact me at: |
|