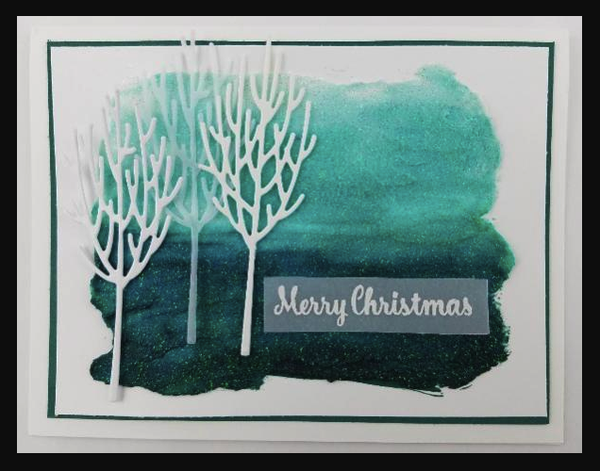
This week's card shows you how to make an ombre textured background that lends itself beautifully for this Christmas design. You can use this same technique for any card and with any color combinations. This is the last week I will be showcasing cards. The following 12 Weeks of Christmas
ideas will focus on gifts, bags & tags.
If you liked the cards I have shown, would like to make them yourself and need some materials, please contact me and I will be happy to help you get started: [email protected].
Create a glittery ombre background to jazz up your holiday cards. It’s a simple technique that provides a lot of wow.
SUPPLIES
Stamp Sets: Winter Woods (w-147658, c-147661)* *purchase this stamp set and the corresponding In the Woods Framelits Dies as a BUNDLE (w-149991, c-149992) and save 10% Star of Light
(142110)
Paper (including cutting dimensions): Whisper White Cardstock [CS] (100730) 8 ½ x 5 ½” scored at 4 ¼”, 5 x 3 ¾” Tranquil Tide Cardstock [CS] 5 1/8 x 3 7/8” Vellum Cardstock [CS] (101856) 2 ¼ x ½”, scrap Glossy White Cardstock [CS] (144240) scrap Shimmery White Cardstock [CS] (101910)
scrap
Accessories: Big Shot Die-Cutting Machine (143263) In the Woods Framelits Dies (147919)* 2nd piece of the BUNDLE Shimmery White Embossing Paste (145645) Palette Knives (142808) Versamark Pad (102283) White Stampin’ Emboss Powder (109132) Heat Tool (129053) SNAIL Adhesive (104332) Mini Glue Dots (103683)
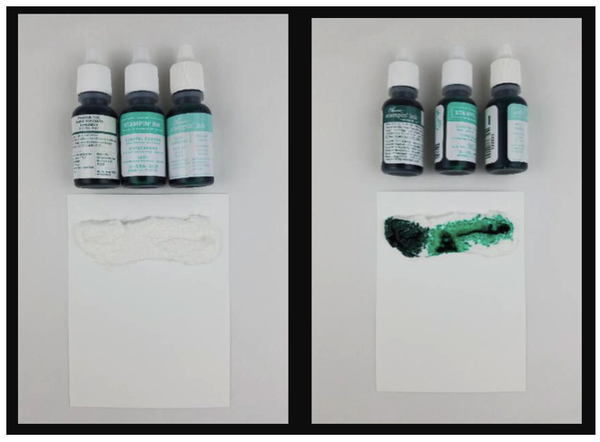
INSTRUCTIONS 1. Spread a thick swath of Shimmery White Embossing Paste on one end of the smaller piece of White CS leaving about ¼” space from 3
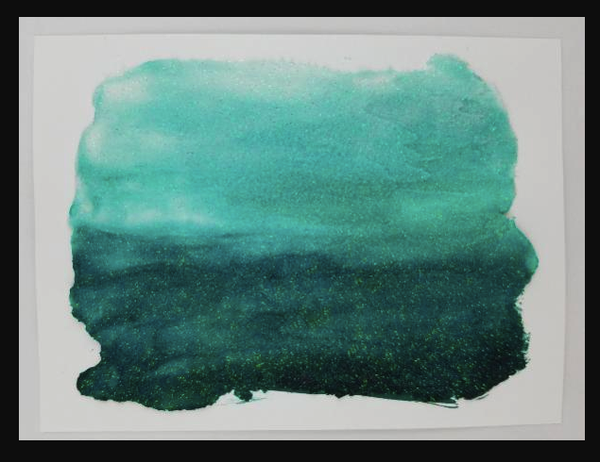
sides. See the photos below for placement and example of thickness. 2. Starting on the right and working towards the left, add 3 drops of Pool Party reinker in a line, then 3 drops of Coastal Cabana reinker, and 1 drop of Tranquil Tide reinker. NOTE: The ink will spread out. See photo for reference. This was taken within seconds of placing the drops spaced out and you can see how much the ink spreads. 3. Use a Palette Knife to spread the paste across the rest of the piece of CS. It’s okay
to work the paste back and forth to blend the ink colors. Set aside to dry. 4. Die cut one bare branch tree from each type of CS scrap: Vellum CS, Glossy White CS, and the Shimmery White CS. 5. On the strip of Vellum CS, stamp the sentiment “Merry Christmas” in Versamark, sprinkle with White Embossing Powder, and heat set with the Heat Tool. NOTE: Turn the Heat Tool on and let it heat up for 30 seconds before heat setting. Use a tweezers to hold on to one end of the vellum piece. Hold the
heat tool about 6 inches from the vellum and heat until the embossing powder melts and turns shiny. 6. Apply SNAIL to the back of the dried embossing paste piece and center it on the Tranquil Tide CS. 7. Fold the large piece of White CS in half and apply SNAIL to the back of the Tranquil Tide CS and center it on the front of the card. 8. Roll a glue dot into a narrow line by running your fingertip over it from edge to edge and place on the back of the Vellum CS tree shape where the
trunk meets the first set of branches. Adhere to card front. Repeat with the Glossy CS and Shimmery White CS trees. 9. Roll a glue dot and place it behind the ‘M’ in Merry. Roll another glue dot and place it behind the ‘m’ in Christmas. Adhere the sentiment to the card front.
This is a great card to make multiples of because you can batch each step and assembly line the actual putting together. Enjoy!